



The Heavy Duty Rug Shaver is built for larger rugs. A little regular care (cleaning, a drop of oil, and the occasional blade or carbon-brush change) keeps the cut even and the motor healthy.
Your kit includes a special screwdriver, a cleaning brush, two spare carbon brushes, an empty oil bottle and a storage box. An optional acrylic guide helps you keep the machine level on the pile. Replacement blades are available separately as heavy duty shaver replacement blades.
Always unplug the machine before you clean it, oil it, or change a blade or a brush.
Safety
- Unplug the machine from the wall. Do not rely on the speed dial being turned down.
- The blades are sharp. Change them over a clear bench, not over the rug.
- Let the machine cool if you have been shearing for a while.
- Work in a well-ventilated space. Shearing throws off a lot of fibre; empty it out of the machine regularly so it does not sit in the motor.
- Use only the adapter and plug that came with the machine (100 to 240V, EU plug).
After every session
- Unplug the machine.
- Brush loose fibre off the blade, the comb and the housing with the cleaning brush from the kit.
- Check that the blade still sits flat and that the screws are snug.
- Oil the blades with sewing machine oil every few hours. The oil bottle in the kit arrives empty; fill it with Eurol sewing machine oil, or another sewing machine oil.
- Store the machine in its box, with the blade protected, so it cannot be knocked out of alignment.
A well-maintained machine, plus the optional guide, will give you a more even shave than a dull, fibre-packed blade. For carving outlines after the all-over shave, see how to carve a tufted rug.
How to change the blade
Change the blade when the cut starts to drag, chew or leave tracks, or if the blade is nicked.
- Unplug the machine and rest it on a stable surface, with the blade pointing away from you.
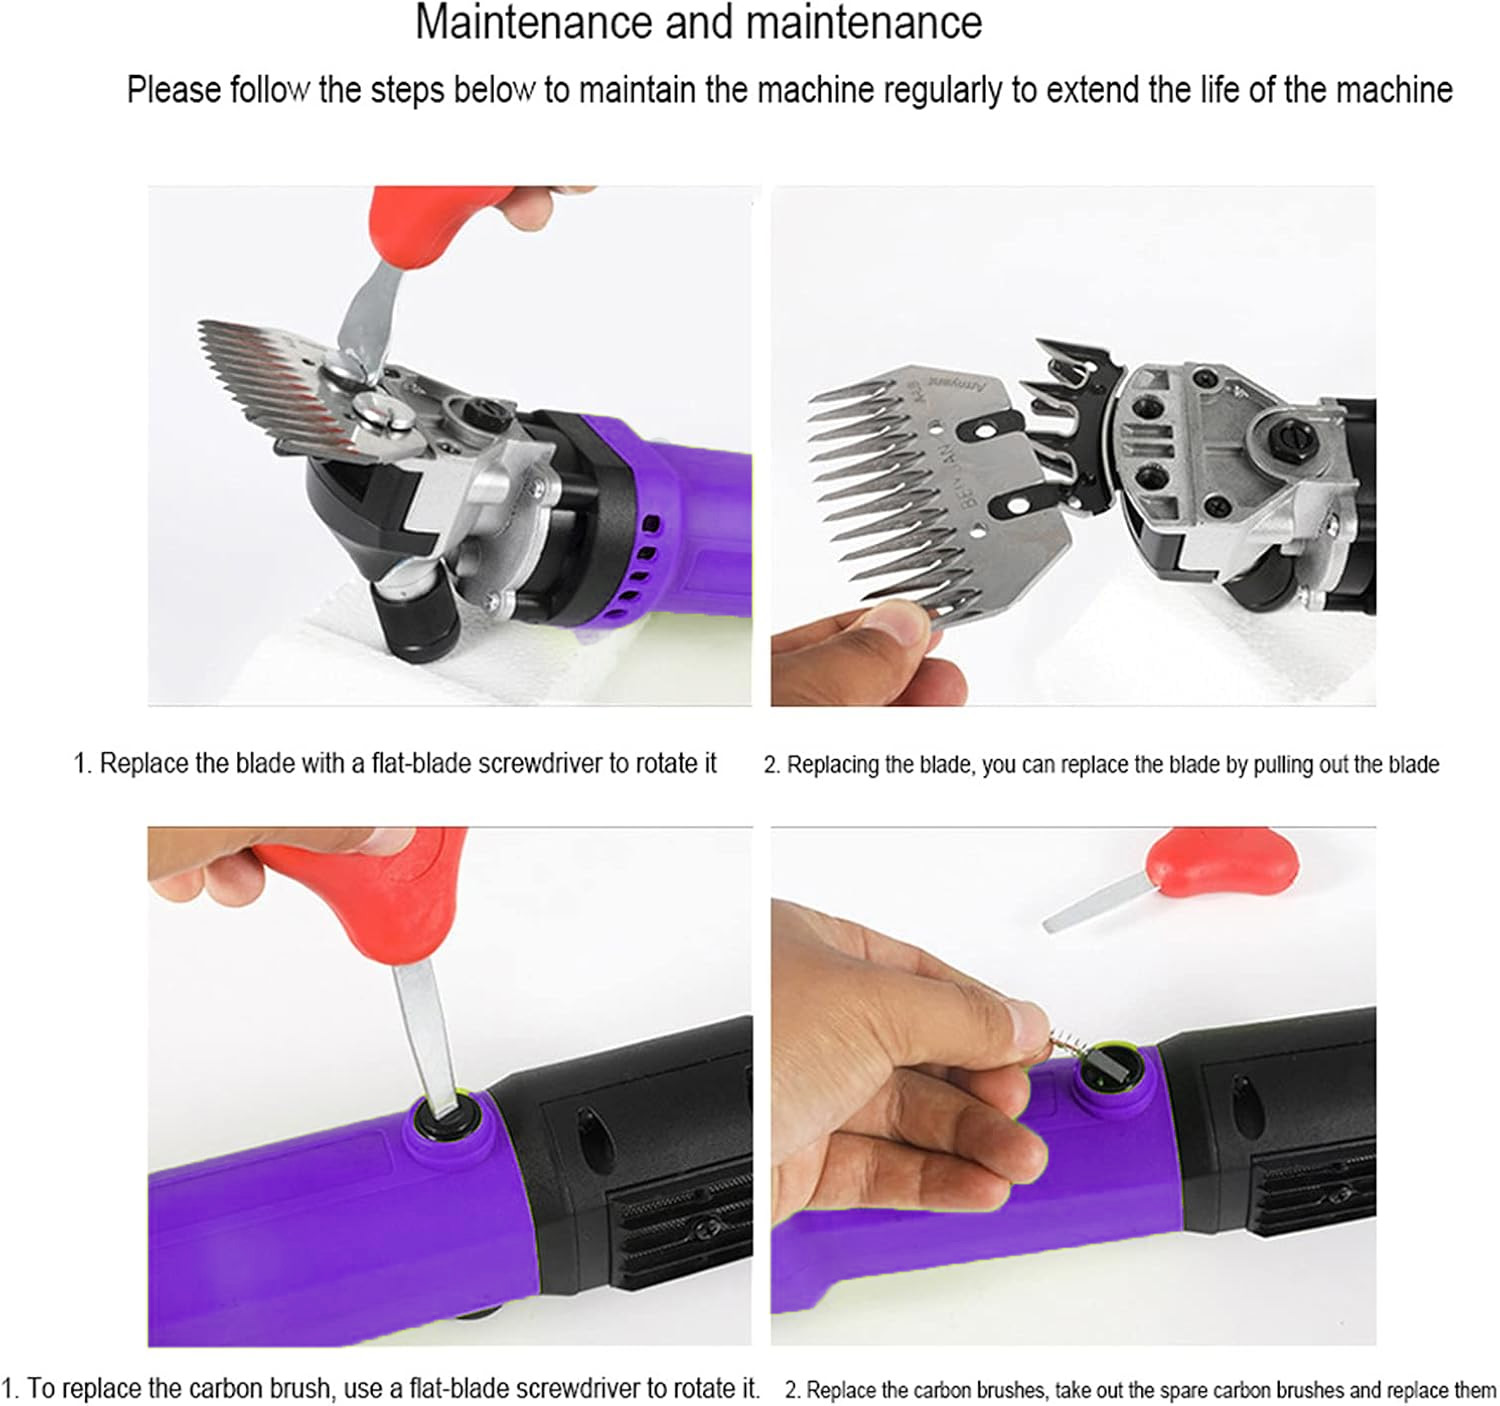
- Use the flat-blade screwdriver from the kit to turn the blade-release, as shown in the top-left photo.
- Slide or lift the blade out, as shown in the top-right photo. Keep your fingers off the cutting edge.
- Fit the new blade in the same orientation, push it fully home, and turn the release back to lock it.
- Check by hand that the blade is locked and sits square, then do a short test pass on a scrap of tufted cloth.
How to replace the carbon brushes
The motor uses two carbon brushes, and two spares come in the box. Replace them when the machine is sparking or losing power. Those spare brushes are the only carbon brushes we sell.
- Unplug the machine.
- On the body of the machine you will see a small round cap (bottom-left photo). Use the flat-blade screwdriver to turn the cap and take it off.
- Take out the worn brush, noting which way it sits.
- Fit a spare carbon brush from the kit (bottom-right photo) and replace the cap.
- Repeat on the other side, so both brushes are renewed together.
If you have used both spares, contact us rather than opening the rest of the motor or looking for another source. If the machine still has no power after a brush change, contact us as well.
Settings to remember when you next use it
The machine has six speeds: 1 to 3 for more control at edges and details, 4 to 6 for large areas. The blade distance is adjustable so you can match the pile. If you are new to the tool, the acrylic guide will help you keep an even height and avoid dipping into the cloth.
Off The Frame: what you made, October 2026
Off The Frame: what you made, September 2026
Wool vs Polyester for Tufting – which yarn should you use?
Introducing Ultra-Vivid: Polyester Tufting Yarn
Creating Fluffy, High-Pile Contrast in Your Rugs
How Much Yarn Do I Need for My Tufting Project?
How Much Yarn Do You Need for Tufting Workshops?
Fabio Passeri’s Tibetan Celestial Dragon